|
|
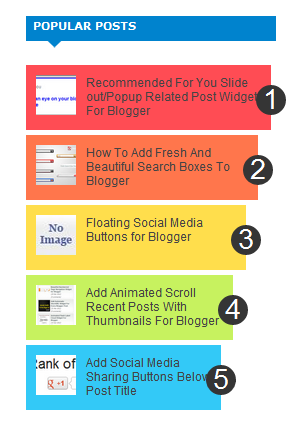
Here in this tutorial, you will see how to add the Multi-Colored Popular Posts widget in the Blogger. Remember to follow the procedure step by step carefully so that you will not face any problem and backup Your template before proceeding.
How To Add Multi-Colored Popular Posts Widget To Blogger?
1. Go to Blogger Dashboard > Template > Edit HTML.
2. Tick the Expand Widget Template check box.
3. Find (Ctrl + F) for below code in your template.
/* Variable definitions
   ====================
4. Copy and paste below code just below/after above code.
<Group description="PopularPosts Backgrounds" selector="#PopularPosts1">
<Variable name="PopularPosts.background.color1" description="background color1" type="color" default="#fa4242" value="#ff4c54"/>
<Variable name="PopularPosts.background.color2" description="background color2" type="color" default="#ee6107" value="#ff764c"/>
<Variable name="PopularPosts.background.color3" description="background color3" type="color" default="#f0f" value="#ffde4c"/>
<Variable name="PopularPosts.background.color4" description="background color4" type="color" default="#ff0" value="#c7f25f"/>
<Variable name="PopularPosts.background.color5" description="background color5" type="color" default="#0ff" value="#33c9f7"/>
</Group>
5. Now find (Ctrl + F) for ]]></b:skin> tag and add below code just above it:
#PopularPosts1 ul{margin:0;padding:5px 0;list-style-type:none}
#PopularPosts1 ul li{position:relative;margin:5px 0;border:0;padding:10px}
#PopularPosts1 ul li:first-child{background:$(PopularPosts.background.color1);width:90%}
#PopularPosts1 ul li:first-child:after{content:"1"}
#PopularPosts1 ul li:first-child + li{background:$(PopularPosts.background.color2);width:85%}
#PopularPosts1 ul li:first-child + li:after{content:"2"}
#PopularPosts1 ul li:first-child + li + li{background:$(PopularPosts.background.color3);width:80%}
#PopularPosts1 ul li:first-child + li + li:after{content:"3"}
#PopularPosts1 ul li:first-child + li + li + li{background:$(PopularPosts.background.color4);width:75%}
#PopularPosts1 ul li:first-child + li + li + li:after{content:"4"}
#PopularPosts1 ul li:first-child + li + li + li + li{background:$(PopularPosts.background.color5);width:70%}
#PopularPosts1 ul li:first-child + li + li + li + li:after{content:"5"}
#PopularPosts1 ul li:first-child:after,#PopularPosts1 ul li:first-child + li:after,#PopularPosts1 ul li:first-child + li + li:after,#PopularPosts1 ul li:first-child + li + li + li:after,#PopularPosts1 ul li:first-child + li + li + li + li:after{position:absolute;top:20px;right:-15px;border-radius:50%;background:#353535;width:30px;height:30px;line-height:1em;text-align:center;font-size:28px;color:#fff}
#PopularPosts1 ul li .item-thumbnail{float:left;border:0;margin-right:10px;background:transparent;padding:0;width:40px;height:40px}
#PopularPosts1 ul li a{font-size:12px;color:#444;text-decoration:none}
#PopularPosts1 ul li a:hover{color:#222;text-decoration:none}
6. Next, search (Ctrl + F) for the following code or similar to this
<b:section-contents id='sidebar-right-1'>
7. Paste the following code below it:
<b:widget id='PopularPosts1' locked='false' title='Popular Posts' type='PopularPosts'> <b:includable id='main'> <b:if cond='data:title'> <h2><data:title/></h2> </b:if> <div class='widget-content popular-posts'> <ul> <b:loop values='data:posts' var='post'> <li> <b:if cond='data:showThumbnails == "false"'> <b:if cond='data:showSnippets == "false"'> <a expr:href='data:post.href' expr:title='data:post.title' rel='bookmark'><data:post.title/></a> <b:else/> <a expr:href='data:post.href' expr:title='data:post.snippet' rel='bookmark'><data:post.title/></a> </b:if> <b:else/> <b:if cond='data:showSnippets == "false"'> <b:if cond='data:post.thumbnail'> <img class='item-thumbnail' expr:alt='data:post.title' expr:src='data:post.thumbnail'/> <b:else/> <img alt='no image' class='item-thumbnail' src='https://blogger.googleusercontent.com/img/b/R29vZ2xl/AVvXsEjdrNCPW8IQc-AjS3FF-GVMeLL5Bflq91l-sMBh7rx2FwyyWOey6orbyqvUfR1lxGXu_e4mv1AGiuoN84PZjj-Qpv7zYChbeH1aSlc3jeRPhaFTqaQPMzMnX7YxLQLZksbfYGidLzlJpuI/s1600/default.jpg'/> </b:if> <a expr:href='data:post.href' expr:title='data:post.title' rel='bookmark'><data:post.title/></a> <div class='clear'/> <b:else/> <b:if cond='data:post.thumbnail'> <img class='item-thumbnail' expr:alt='data:post.title' expr:src='data:post.thumbnail'/> <b:else/> <img alt='no image' class='item-thumbnail' src='https://blogger.googleusercontent.com/img/b/R29vZ2xl/AVvXsEjdrNCPW8IQc-AjS3FF-GVMeLL5Bflq91l-sMBh7rx2FwyyWOey6orbyqvUfR1lxGXu_e4mv1AGiuoN84PZjj-Qpv7zYChbeH1aSlc3jeRPhaFTqaQPMzMnX7YxLQLZksbfYGidLzlJpuI/s1600/default.jpg'/> </b:if> <a expr:href='data:post.href' expr:title='data:post.snippet' rel='bookmark'><data:post.title/></a> <div class='clear'/> </b:if> </b:if> </li> </b:loop> </ul> </div> </b:includable> </b:widget>
8. Save your template.
Widget Settings:
- Go to Blogger Dashboard > Layout.
- Click on the EDIT link of Popular Posts widget.
- Select "display up to 5 posts".
- Save the widget.
Customise Widgets:
- Go to Template > Customise (Template Designer)
- Advanced > Popular Posts Background
- Now customize the widget as you wish and save your template.
If you are enjoying reading this blog, please like & subscribe for more tutorials.
For any questions or suggestions, leave a comment below.
0 comments:
Post a Comment